This walkthrough demonstrates how to import a .NET assembly, and automatically generate Excel add-in functions for its methods and properties, by adding XLL export attributes to the .NET code.
You can find a copy of all the code used in this walkthrough
in the Walkthroughs/NetWrapAttr folder in your
XLL+ installation, along with a demonstration spreadsheet,
NetWrapAttr.xls.
Please note that this walkthrough is not available under XLL+ for Visual Studio .NET. XLL+ interacts with .NET using C++/CLI, which is only available under Visual Studio 2005 and above.
Run-time requirements
Please note that if you are using Visual Studio 2005, you must have Service Pack 1 installed in order to build a valid XLL.
If the add-in fails to load into Excel at run-time, please see the technical note .NET requirements.
In order to build MyLib.dll, you need the C# project system
to be installed on your computer.
Creating the add-in project
-
From the File menu, select New and then Project to open the New Project dialog.
-
Select the XLL+ 7 Excel Add-in project template from the list of Visual C++ Projects, and enter NetWrapAttr in the Name box. Under Location, enter an appropriate directory in which to create the project.
-
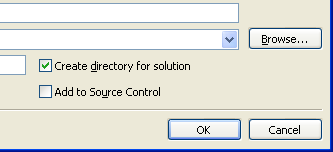
Put a tick next to "Create directory for solution", and click OK.
-
In the "Application Settings" page of the XLL+ AppWizard, put a tick against Common Language Runtime Support (/clr).
-
Click Finish to create the new add-in project.
For more information about creating projects, see Creating an add-in project in the XLL+ User Guide.
Creating the imported .NET assembly
Now create a new C# project and add it to the solution.
-
In the Visual Studio Solution Explorer window, right-click the solution node and select Add/New Project....
-
Select the Visual C# project type in the tree on the left-hand side, and select Class Library in the list on the right. (In Visual Studio 2017, select Class Library (.NET Framework).)
-
Enter
MyLibfor the project Name, and accept the default Location. Press OK. -
Open the project properties of MyLib, and, in the Build page, towards the bottom of the page, put a tick against XML documentation file.
-
If you are using Visual Studio 2015 or above, then select the Application page of the project properties, and set the Target framework to be
.NET Framework 4. This will make the .NET project compatible with the XLL+ C++ project. Alternatively, you can change the C++ project to use .NET Framework 4.5 or above as its target framework. Close the project in Visual Studio, or unload it, and directly edit the project fileNetWrapAttr.vcxproj. Locate the element<PropertyGroup Label="Globals">and insert the desired target framework, e.g.: <TargetFrameworkVersion>v4.5.2</TargetFrameworkVersion> See How to: Modify the Target Framework and Platform Toolset for details. -
Open
Class1.csand replace all the code with the code below.
 CopyC#
using System; using System.ComponentModel; namespace MyLib { /// <summary> /// Contains static calls to test parameter & return types /// </summary> public static class TestClass { /// <summary> /// returns the concatenation of the arguments. /// </summary> /// <param name="a">is a string</param> /// <param name="b">is a number</param> /// <param name="c">is an integer</param> /// <param name="d">is a boolean</param> /// <returns></returns> public static string T1(string a, double b, int c, bool d) { return String.Format("a={0};b={1};c={2};d={3}", a, b, c, d); } /// <summary> /// returns an array of strings which are concatenations /// of the arguments. /// </summary> /// <param name="a">is a vector of strings</param> /// <param name="b">is a vector of numbers. It must be the same length as a.</param> /// <param name="c">is a vector of integers. It must be the same length as a.</param> /// <param name="d">is a vector of booleans. It must be the same length as a.</param> public static string[] T2(string[] a, double[] b, int[] c, bool[] d) { if (a.Length != b.Length) throw new ArgumentException(String.Format("Expected {0} items for b", a.Length)); if (a.Length != c.Length) throw new ArgumentException(String.Format("Expected {0} items for c", a.Length)); if (a.Length != d.Length) throw new ArgumentException(String.Format("Expected {0} items for d", a.Length)); string[] res = new string[a.Length]; for (int i = 0; i < res.Length; i++) res[i] = T1(a[i], b[i], c[i], d[i]); return res; } /// <summary> /// is a test function which adds two integers. /// </summary> /// <param name="a">is the first integer.</param> /// <param name="b">is the second integer.</param> /// <returns></returns> public static int T3(int a, int b) { return a + b; } /// <summary> /// This function will not be exported, because it is not marked /// with a XllFunction attribute. /// </summary> /// <param name="a">is an argument</param> /// <param name="b">is an argument</param> /// <returns>the sum of the inputs</returns> public static int DontExportMe(int a, int b) { return a + b; } /// <summary> /// Returns the type of an argument of unknown type /// </summary> /// <param name="arg">A value of any type</param> /// <returns>The value and type of the input</returns> public static string VarTypeScalar(object arg) { return String.Format("{0} ({1})", arg, arg == null ? "none" : arg.GetType().Name); } /// <summary> /// Returns the types of a vector of values of unknown type /// </summary> /// <param name="arg">is a vector of values of unknown type</param> /// <returns>a vector containing the values and types of the inputs</returns> public static string[] VarTypeVector(object[] arg) { string[] res = new string[arg.Length]; for (int i = 0; i < arg.Length; i++) res[i] = VarTypeScalar(arg[i]); return res; } /// <summary> /// Returns the types of a matrix of values of unknown type /// </summary> /// <param name="arg">is a matrix of values of unknown type</param> /// <returns>a matrix containing the values and types of the inputs</returns> public static string[,] VarTypeMatrix(object[,] arg) { string[,] res = new string[arg.GetLength(0), arg.GetLength(1)]; for (int i = 0; i < arg.GetLength(0); i++) for (int j = 0; j < arg.GetLength(1); j++) res[i, j] = VarTypeScalar(arg[i, j]); return res; } /// <summary> /// Returns a result of variable type /// </summary> /// <param name="type">indicates the type of value to return</param> /// <returns>a value of variable type</returns> public static object VarRet(int type) { switch (type) { case 0: return "A string"; case 1: return true; case 2: return (double)123.456; } throw new ArgumentException("type must be 0, 1 or 2", "type"); } /// <summary> /// A public enumeration /// </summary> public enum Periods { Monthly = 12, Quarterly = 4, SemiAnnual = 2, Annual = 1 } /// <summary> /// Calculates the discount factor for a given period and interest rate /// </summary> /// <param name="rate">is the interest rate</param> /// <param name="period">is a time period</param> /// <returns></returns> public static double DiscountFactor(double rate, Periods period) { return Math.Exp((-1.0 / ((double)(int)period)) * rate); } } }
Adding attributes to the exported functions
To add attributes to the .NET assembly, follow these steps:
-
Select the MyLib project in the Solution Explorer, and add a reference to the XLL+ runtime library.
Right-click MyLib and click on "Add Reference...". Select the "Browse" page and navigate to the
binsub-directory of your XLL+ installation folder, typically[Program Files]\Planatech\XllPlus\7.0\VS8.0\bin. SelectPsl.XL7.XnReflect.Runtime.dlland press OK. -
In
Class1.cs, add the following line to the list ofusingstatements:CopyC#using System; using System.ComponentModel; using XllPlus;
-
Add a
XllClassExportattribute to the class:CopyC#[XllClassExport(Category=XlCategory.UserDefined, Prefix="Test.")] public class TestClass { ...
This attribute will control the category and prefix of all exported methods of the class. Unless otherwise specified, exported functions will be named Test.Function (where Function represents the method name) and will appear in the "User Defined" category in the Excel Formula Wizard.
-
Add an
XllFunctionattribute to the methodTestClass.T1:CopyC#[XllFunction] public static string T1(string a, double b, int c, bool d) { return String.Format("a={0};b={1};c={2};d={3}", a, b, c, d); }
This attribute will cause the function to be exported, as an Excel add-in function named
Test.T1. -
Add an
XllFunctionattribute, with parameters, to the methodTestClass.T2:CopyC#[XllFunction("TestArrays", Prefix="")] public static string[] T2(string[] a, double[] b, int[] c, bool[] d) { ... }
This attribute will cause the function to be exported as an Excel add-in function named
TestArrays, with no prefix. -
Add an
XllFunctionattribute to the methodTestClass.T3:CopyC#[XllFunction] public static int T3(int a, int b) { return a + b; }
This attribute will cause the function to be exported as an Excel add-in function named
TestClass.T3. -
Add
XllArgumentattributes to the arguments ofTestClass.T3:CopyC#[XllFunction] public static int T3( [XllArgument("First", Flags=XlArgumentFlags.Optional, DefaultValue="100")] int a, [XllArgument("Second", Flags=XlArgumentFlags.Optional, DefaultValue="-99")] int b) { return a + b; }
These attributes will change the names of the arguments a and b to First and Second respectively. They also provide default values for each argument which will be used if the argument is omitted.
-
Note that no attribute is specified for the method
TestClass.DontExportMe. Consequently, the function is not exported to Excel. -
Add
XllFunctionattributes to the methodsTestClass.VarTypeScalar,TestClass.VarTypeVectorandTestClass.VarTypeMatrix:CopyC#[XllFunction] public static string VarTypeScalar(object arg) { return String.Format("{0} ({1})", arg, arg == null ? "none" : arg.GetType().Name); } [XllFunction] public static string[] VarTypeVector(object[] arg) { ... } [XllFunction] public static string[,] VarTypeMatrix(object[,] arg) { ... }
The attribute will cause each of these methods to be exported to Excel. The arguments of each method are
objecttypes, and these are treated specially by the code importer; they can contain one or more values of any Excel value type: string, number, boolean or empty. Each cell value will be converted to a value of the appropriate type (System.String, System.Double, System.Boolean or null) before the .NET method is invoked. -
Add an
XllFunctionattribute to the methodTestClass.VarRet:CopyC#[XllFunction] public static object VarRet(int type) { ... }
This attribute will cause the function to be exported as an Excel add-in function named
TestClass.VarRet. -
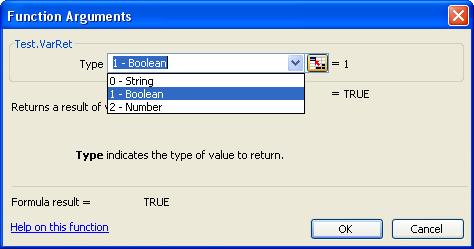
Add an
XllArgumentattribute to the type argument ofTestClass.VarRet:CopyC#[XllFunction] public static object VarRet( [XllArgument(Flags=XlArgumentFlags.ShowValueListInFormulaWizard, ValueList="0,String;1,Boolean;2,Number")] int type) { ... }
This attribute will add a value list for the argument. The value list will appear in a drop-down list when the function appears in the Excel Formula Wizard:
-
Add an
XllFunctionattribute to the methodTestClass.DiscountFactor:CopyC#[XllFunction] public static double DiscountFactor(double rate, Periods period) { return Math.Exp((-1.0 / ((double)(int)period)) * rate); }
This attribute will cause the function to be exported as an Excel add-in function named
TestClass.DiscountFactor. -
Add an
XllArgumentattribute to the period argument ofTestClass.DiscountFactor:CopyC#[XllFunction] public static double DiscountFactor(double rate, [XllArgument(Flags = XlArgumentFlags.ShowValueListInFormulaWizard)] Periods period) { return Math.Exp((-1.0 / ((double)(int)period)) * rate); }
This attribute will add a value list for the argument. The value list will appear in a drop-down list when the function appears in the Excel Formula Wizard. Because
Periodsis anEnumtype, there is no need to specify the value list: it is generated automatically by the assembly importer.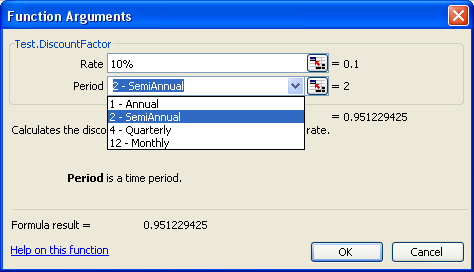
Add a reference to the assembly
Before we can import the .NET assembly into the XLL+ project, we must create a reference to it.
-
In Solution Explorer, find the node for the project NetWrapAttr and right-click it. Select Properties.
-
In the Project Properties window, select the node "Common Properties/References", and click the "Add New Reference..." button.
-
In Visual Studio 2015 or 2017, right-click the the "References" node beneath the project node and click "Add Reference...".
-
You may have to wait a long time for the "Add Reference" window to appear.
-
In the "Add Reference" window, select the tab "Projects", select "MyLib" in the list, and press OK.
-
In the Project Properties window, click OK to save your changes.
-
You should now build the solution (Shift+Ctrl+B), and make sure that both projects built successfully. Make sure that the build is set to "Win32", "x86" or "x64"; avoid "Mixed Platforms". Also, if necessary, use the Build/Configuration Manager... command to open the solution configuration window, and ensure that both projects have a tick in the "Build" column.
Note that on Visual Studio 2015 and 2017, where there is no "Common Properties/References" node in the Project Properties, you should instead use the Solution Explorer window: select the "References" node under the project node, and right-click it, then select the "Add Reference..." command.
Importing the assembly
In these steps you will set up a link between the two projects. Once it is done, the build process will include an extra step, which inspects the .NET assembly and generates wrapper add-in functions for all the exported methods and properties. Whenever the .NET assembly is changed, this code will be regenerated during the next build.
-
Open the main source file of the add-in project,
NetWrapAttr.cpp. -
Activate the XLL Add-ins tool window (View/Other Windows/XLL Add-ins).
-
Click on Import Assemblies... in the Tools menu.
-
In the list of assemblies, put a check against
MyLib.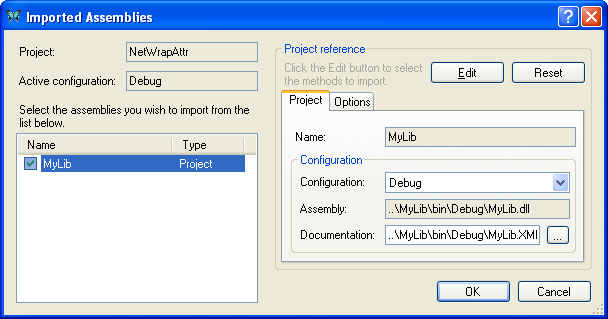
-
Click OK to save your changes and return to Visual Studio.
The completed project
If you inspect the add-in project in Solution Explorer, you will see
that two new files have been added. In the folder "NetWrap/Imported files"
are MyLib.import.xml and MyLib_Wrappers.cpp.
MyLib.import.xml contains instructions for importing the
.NET assembly. When it is built, the XLL+ reflection tool, XNREFLECT.EXE,
is run, which generates the C++ code for the XLL add-in functions,
and write it to MyLib_Wrappers.cpp.
-
Build the project. If you are working with a 64-bit version of Excel, then be sure to select the 64-bit platform
x64before you build.You will observe a new step in the build process, when
MyLib_Wrappers.cppis generated. -
Inspect
MyLib_Wrappers.cpp. Each of the functions is simply a wrapper for a .NET method, and contains code to validate inputs, translate them to CLR data forms, invoke the .NET method and finally convert the result to Excel data form. If any method throws an exception, it will be caught and reported back to Excel. -
Use F5 to run and debug the add-in. Place break-points in the C# code, and you will see that the debugger seamlessly steps between the C++ and C# modules.
See Importing .NET assemblies in the User Guide for more details.