Note: These instructions are for users of Microsoft Visual Studio 6. For instruction on installing the XLL+ add-in under Microsoft Visual Studio .NET or Visual Studio 2005, click here.
After you have installed XLL+ on your machine, using the Setup program, there is one more procedure required to complete the installation.
Follow the steps below:
- Open Microsoft Developer Studio.
- Click on the menu command: Tools - Customize.
- In the Customize dialog, select the Add-ins and Macro Files tab.
- Put a check against XLL+ Function Wizard 4.2, as shown below:
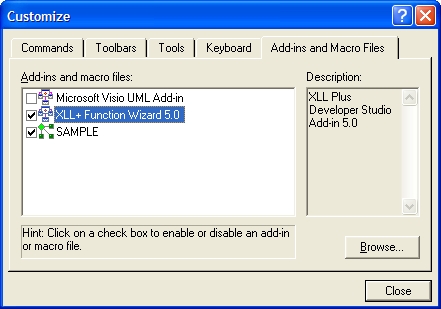
- Click on Close. The add-in is now registered, and it will be opened each time DevSudio starts.
- In DevStudio, the XLL+ Toolbar will now be visible.

You can use the toolbar to show the XLL+ Function Wizard, which helps you create and edit add-in functions within projects created by the XLL+ AppWizard.
Next: Registering the add-in in Visual Studio .NET & Visual Studio 2005 >>