Excel supports native dialogs, through the SDK DIALOG() interface. XLL+ contains several classes which make it easy to use native dialogs:
- CXlDialog
- CXlControl
- Classes descended from CXlControl
To implement your own native dialog, you should create a class descended from CXlDialog, and initialise it with its component controls.
This walkthrough demonstrates how to create and use a native Excel dialog.
Creating the project
To create the project using Visual Studio 6
- From the File menu, select New to show the New dialog.
- Select the XLL+ AppWizard 4 project template from the list in the Projects tab, and enter DlgDemo in the Project name box. Under Location, enter an appropriate directory in which to create the project.
- On the first page of the XLL+ AppWizard, set the display name of the add-in to be Native dialog demo (instead of "New Xll").
- For all the other settings in both pages of the XLL+ AppWizard, accept the default.
To create the project using Visual Studio .NET or Visual Studio 2005
- From the File menu, select New and then Project to open the New Project dialog.
- Select the XLL+ Excel Add-in project template from the list of Visual C++ Projects, and enter DlgDemo in the Name box. Under Location, enter an appropriate directory in which to create the project.
- In the XLL+ AppWizard, set the XLL friendly name to Native dialog demo (instead of "DlgDemo").
- For all the other settings in in the XLL+ AppWizard, accept the default.
For more details about creating projects, see Creating an add-in project in the XLL+ User Guide.
Adding code
Adding the dialog class
-
In your application's main source file, DlgDemo.cpp,
include xldialog.h, after
the line that includes DlgDemo.h.
#include "DlgDemo.h"
#include <xldialog.h>
-
Add a new class, CMyDialog, using the code below:
class CMyDialog : public CXlDialog {
public:
    // Controls
    CXlControlStatic lblIntro;
    CXlControlRefEdit edtRef;
    CXlControlOK btnOK;
    CXlControlCancel btnCancel;
public:
    // Constructor - contains all initialisation
    CMyDialog()
    : CXlDialog("My Dialog", 300, 65)
    {
        // Set label text
        lblIntro.SetText("Please select a range of cells");

        // Set OK button position
        btnOK.SetPos(220, 11);

        // Set cell reference to current cell
        CXlOper xloRef;
        if (xloRef.GetActiveCell())
            edtRef.SetRef(xloRef);

        // Add all controls to the dialog
        Add(4, &lblIntro, &edtRef, &btnOK, &btnCancel);

        // Set the initial focus
        SetFocus(edtRef);
    }
};
Using the dialog class
- Create a new add-in function , using the code below.
// Function: ShowMyDialog // Purpose: Shows a user-defined dialog //{{XLP_SRC(ShowMyDialog) // NOTE - the FunctionWizard will add and remove mapping code here. // DO NOT EDIT what you see in these blocks of generated code! IMPLEMENT_XLLFN2(ShowMyDialog, "A", "ShowMyDialog", "", "User Defined", "Shows a user-defined dialog", "", "", 2) extern "C" __declspec( dllexport ) BOOL ShowMyDialog() { //}}XLP_SRC // Show the dialog CMyDialog dlg; if (!dlg.Show()) { // User cancelled return FALSE; } // Get the cell reference from the dialog CXlOper xloRef; if (dlg.edtRef.GetRef(xloRef)) { // Paste a value into the dialog's selected cell(s) xloRef.SetValue("abcd"); } return TRUE; } - Build the project.
Testing the add-in
To test the add-in
- Start Excel, and use File - Open to open the built add-in file DlgDemo.xll in the Debug sub-directory of your project directory.
- Use the Tools - Macro - Macros... menu option (or Alt+F8) to display the Macro dialog.
- Type the name of the add-in function, ShowMyDialog, into the Macro name field, and click Run.
- The custom dialog appears, with the reference edit field selected.
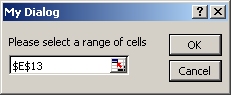
- Use the mouse or keyboard to select one or more cells.
- Click OK in the custom dialog, and notice that the text "abcd" appears in each of the cells you selected.