XLL+ contains several classes which support matrix operations, to make it easy to read and return 2-dimensional array arguments to and from Excel. You may already have code which uses your own matrix classes.
This walkthrough demonstrates how to use your own matrix classes in place of those contained in XLL+.
Creating the project
To create the project using Visual Studio 6
- From the File menu, select New to show the New dialog.
- Select the XLL+ AppWizard 4 project template from the list in the Projects tab, and enter MtxAdapt1 in the Project name box. Under Location, enter an appropriate directory in which to create the project.
- On the first page of the XLL+ AppWizard, set the display name of the add-in to be Matrix adapter demo (instead of "New Xll").
- For all the other settings in both pages of the XLL+ AppWizard, accept the default.
To create the project using Visual Studio .NET or Visual Studio 2005
- From the File menu, select New and then Project to open the New Project dialog.
- Select the XLL+ Excel Add-in project template from the list of Visual C++ Projects, and enter MtxAdapt1 in the Name box. Under Location, enter an appropriate directory in which to create the project.
- In the XLL+ .NET/2005 AppWizard, set the XLL friendly name to Matrix adapter demo (instead of "MtxAdapt1").
- For all the other settings in in the XLL+ AppWizard, accept the default.
For more details about creating projects, see Creating an add-in project in the XLL+ User Guide.
Adding code
Adding the existing code
In this walkthrough, we assume that there is an existing matrix class and a body of code that uses it. The following steps create this "existing" code.
- Add a new header file stdmatrix.h to the project.
- Insert the following code in stdmatrix.h.
#ifndef __STDMATRIX_H__
#define __STDMATRIX_H__

namespace std_tools {

    template<class T, class A = std::allocator<T> >
    class matrix {
    public:
        typedef A::size_type size_type;

        matrix<T, A>(const A& al = A()) : n_(0), v_(al) {}
        matrix<T, A>(size_type m, size_type n, const T& v = T(), const A& al = A()) : n_(0), v_(al) {
            assign(m, n, v);
        }
        matrix<T, A>(const matrix<T, A>& x) : n_(0) {
            n_ = x.size1();
            assign(x.size0() * x.size1(), x.begin(), x.end());
        }
        matrix<T, A>(const T* v, size_type m, size_type n) {}

        void assign(size_type m, size_type n, const T& x = T()) {
            n_ = n;
            v_.assign(m * n, x);
        }

        size_type size0() const { return n_ ? (v_.size() / n_) : 0; }
        size_type size1() const { return n_; }

        T& at(size_type pos0, size_type pos1) { return v_.at(c_(pos0, pos1)); }
        const T& at(size_type pos0, size_type pos1) const { return v_.at(c_(pos0, pos1)); }

        std::vector<T, A>::iterator begin() { return v_.begin(); }
        std::vector<T, A>::const_iterator begin() const { return v_.begin(); }
        std::vector<T, A>::iterator end() { return v_.end(); }
        std::vector<T, A>::const_iterator end() const { return v_.end(); }

    protected:
        std::vector<T, A> v_;
        size_type n_;           // Size of second dimension
        size_type c_(size_type i, size_type j) const { return (i * n_) + j; }
    };

    // Example algorithms using matrix class
    template<class T>
    T sum(const matrix<T>& m) {
        T sum = 0;
        for (std::vector<T>::const_iterator it = m.begin(); it < m.end(); it++)
            sum += *it;
        return sum;
    }

    template<class T>
    void transpose(const matrix<T>& src, matrix<T>& dest) {
        matrix<T>::size_type i, j;
        dest.assign(src.size1(), src.size0());
        for (i = 0; i < dest.size0(); i++) {
            for (j = 0; j < dest.size1(); j++) {
                dest.at(i, j) = src.at(j, i);
            }
        }
    }

} // namespace std_tools

#endif //__STDMATRIX_H__
Creating the adapter class
In order to install our matrix class into XLL+, we must first create an adapter class which will communicate between the matrix class and the XLL+ functions which use matrices.
The adapter class should implement the ple::imtx interface. The easiest way to achieve this is to inherit from the ple::mtx_impl class. The adapter must also provide a simple constructor (with no arguments) which creates an instance of the adapted matrix class within the adapter. (This constructor will be used by the code genereated by the XLL+ Function Wizard.)
- Add a new header file stdmatrix_adapt.h to the project.
- Insert the following code in stdmatrix_adapt.h.
#ifndef __STDMATRIX_ADAPT_H__ #define __STDMATRIX_ADAPT_H__ #include <plemtx.h> #include "stdmatrix.h" namespace std_tools { template<class T> class matrix_adapter : public ple::imtx_impl<T> { protected: matrix<T>* m_; bool owned_; public: matrix_adapter<T>() : m_(new matrix<T>), owned_(true) {} matrix_adapter<T>(matrix<T>& m) : m_(&m), owned_(false) {} ~matrix_adapter<T>() { if (owned_) delete m_; } virtual void resize(bool preserve, mtx_size dim0, mtx_size dim1) { if (preserve) throw "operation not supported"; m_->assign(dim0, dim1); } virtual T& at(mtx_size i0, mtx_size i1) { return m_->at(i0, i1); } virtual const T& at(mtx_size i0, mtx_size i1) const { return m_->at(i0, i1); } virtual mtx_size size(int dim) const { return (dim == 0) ? m_->size0() : m_->size1(); } virtual bool get_flat(T*& data) { data = &m_->at(0, 0); return true; } virtual bool get_flat(const T*& data) const { data = &m_->at(0, 0); return true; } matrix<T>& m() { return *m_; } const matrix<T>& m() const { return *m_; } }; template<class T> matrix_adapter<T> ple_adapter(matrix<T>& m) { return matrix_adapter<T>(m); } } // namespace std_tools #endif //__STDMATRIX_ADAPT_H__ - Examine the class's data members:
        matrix<T>* m_;
        bool owned_;
m_ is a pointer to an instance of the adapted matrix class. The owned_ flag determines whether the matrix *m_ is owned by the adapter. If it is true, then *m_ will be deleted when the adapter is destroyed. - Examine the first constructor:
matrix_adapter<T>() : m_(new matrix<T>), owned_(true) {}The constructor creates a new, empty instance of matrix<T>, and sets _owned to true, to ensure that it is destroyed along with the adapter. This constructor (i.e. a constructor with no arguments) will be used in the code generated by the XLL+ Function Wizard. - Examine the second constructor:
matrix_adapter<T>(matrix<T>& m) : m_(&m), owned_(false) {}The constructor stores a reference to an existing instance of matrix<T>, and sets _owned to false, so that the referenced instance will not be destroyed along with the adapter. This constructor is useful for adapting matrix values so that they can be returned to Excel. - Examine the resize() method:
        virtual void resize(bool preserve, mtx_size dim0, mtx_size dim1) {
            if (preserve)
                throw "operation not supported";
            m_->assign(dim0, dim1);
        }
Note that the method fails if the preserve flag is true, since the underlying matrix class does not support such an operation. - Note that all the virtual methods are simple shells around the methods of the adapted class.
- Note that the get_ptrs() methods of ple::imtx are not supported, since the underlying class stores its data in a "flat" arrangement.
- Notice the m() methods, which can be used to get access to the matrix object nested inside the adapter.
- Finally, note the template function ple_adapter(), which uses the second form of the constructor to create an instance of the adapter from an existing instance of a matrix. This is a convenient way to convert a matrix class to its adapter, and thereby make it available to the CXlOper array methods for output to Excel.
Installing the adapter
- Add the following code to MtxAdapt1.cpp.
/////////////////////////////////////////////////////////////////////////////
// Install matrix adapter

#include "stdmatrix.h"
#include "stdmatrix_adapt.h"
using namespace std_tools;

#undef MTX_PTRS
#undef MTX_FLAT
#define MTX_PTRS matrix_adapter
#define MTX_FLAT matrix_adapter
- Note that the code above must appear before any add-in functions, since it overrides macros used by the add-in functions' generated code.
Using the adapter class
- Create a new add-in function, using the code below.
// Function: MtxTest1 // Purpose: Matrix test routine //{{XLP_SRC(MtxTest1) // NOTE - the FunctionWizard will add and remove mapping code here. // DO NOT EDIT what you see in these blocks of generated code! IMPLEMENT_XLLFN2(MtxTest1, "RP", "MtxTest1", "X", "Math & Trig", "Matrix test routine", "No description provided\000", "B0()0()X No description provided\0", 1) extern "C" __declspec( dllexport ) LPXLOPER MtxTest1(const COper* X) { CXlOper xloResult; BOOL bOk = TRUE; MTX_PTRS<double> matX; bOk = bOk && X->ReadMatrix(matX, "X", xloResult, 0, 0, XLA_ARRAY_FLAGS_STD, 0, 0); if (!bOk) return xloResult.Ret(); //}}XLP_SRC // Pass nested matrix object to sum() algorithm, and return result xloResult = sum(matX.m()); return xloResult.Ret(); } -
All but one line is absolutely standard code, as generated by the XLL+ Function Wizard.
Only the following line was added:
xloResult = sum(matX.m());
Note that the m() method is used to pass the nested matrix object to the sum algorithm. - Create another new add-in function, using the code below.
// Function: MtxTest2 // Purpose: Returns the transpose of a matrix //{{XLP_SRC(MtxTest2) // NOTE - the FunctionWizard will add and remove mapping code here. // DO NOT EDIT what you see in these blocks of generated code! IMPLEMENT_XLLFN2(MtxTest2, "RP", "MtxTest2", "X", "Math & Trig", "Returns the transpose of a matrix", "Input matrix\000", "B0()0()X Input matrix\0", 1) extern "C" __declspec( dllexport ) LPXLOPER MtxTest2(const COper* X) { CXlOper xloResult; BOOL bOk = TRUE; MTX_PTRS<double> matX; bOk = bOk && X->ReadMatrix(matX, "X", xloResult, 0, 0, XLA_ARRAY_FLAGS_STD, 0, 0); if (!bOk) return xloResult.Ret(); //}}XLP_SRC // Use the transpose algorithm to populate mY matrix<double> mY; transpose(matX.m(), mY); xloResult = ple_adapter(mY); return xloResult.Ret(); } - Note that, as in the previous add-in function, the m() method is used to pass the nested matrix object to the transpose algorithm.
- Note the use of the ple_adapter() function to create an adapter for the
matrix mY, which is then used as the argument to the overloaded = operator of CXlOper:
const CXlOper& operator=(const ple::imtx<T>& mat);
Testing the add-in
To test the add-in
- Build the project.
- Start Excel, and use File - Open to open the built add-in file MtxAdapt1.xll in the Debug sub-directory of your project directory.
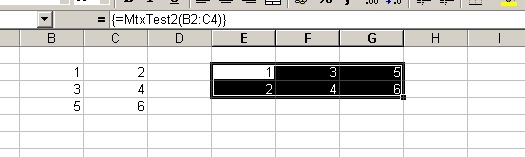
- In an empty spreadsheet, fill a rectangular range with numbers.
- Select a range, and enter an argument as shown below,
then press Ctrl+Shift+Enter to create an array formula.