There are several steps required to add CUDA support to an XLL+ project.
- Install the Nvidia GPU toolkit
- Create an XLL+ project
- Add CUDA support to the project
- Add CUDA source file(s) to the project
- Complete the CUDA support by changing various project settings
Install the Nvidia GPU toolkit
Warning: take extreme care when installing new drivers on a computer, and consult with support staff as required.
- Locate the Nvidia GPU toolkit at the Nvidia Developer Zone (http://developer.nvidia.com/cuda-toolkit). This topic assumes that production release 4.1 is used.
- Check whether your computer has an appropriate graphics card before continuing; a list of CUDA-supporting cards is available at the Nvidia Developer Zone.
- Download and install the latest Nvidia developer drivers.
- Download the
"CUDA Toolkit Downloads" (Windows), either 32-bit or 64-bit, and install it. Note that if you install the 32-bit toolkit you will not be able to build 64-bit code, but that the 64-bit toolkit will let you build both 32-bit and 64-bit add-ins. - Optionally, download the
"GPU Computing SDK Downloads" (Windows)and install it.
Create an XLL+ project
Using XLL+ 7, create a standard XLL+ add-in project.
You should choose the STL run-time libraries, not the MFC libraries. This guide assumes that you create a 64-bit version as well as a 32-bit version.
Add CUDA support to the project
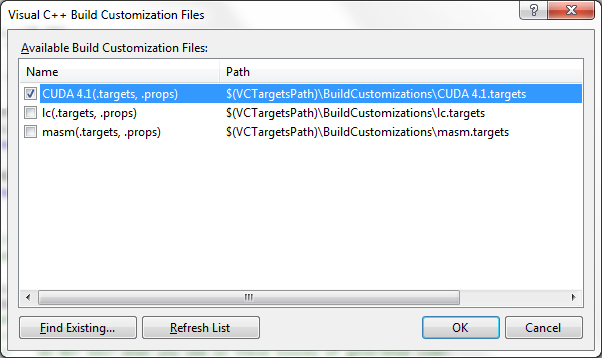
In Visual Studio 2010, select the project in the Solution Explorer and right-click the Build Customizations... menu.
Put a check against CUDA 4.1 (.targets, .props), as shown below, and click OK.
In Visual Studio 2008 or 2005, select the project in the Solution Explorer and right-click the Custom Build Rules... menu.
Put a check against CUDA Runtime API Build Rule, as shown below, and click OK.

Add CUDA source file(s) to the project
This step is a little more complicated than it should be because the CUDA support in Visual Studio is incomplete:- .cu files are not available in the New File dialog.
- Open the File/New/File... dialog and select
General/Text File; Click OK. - Select the File/Save as... command. In the dialog, navigate to the project directory.
Set Save as type to
All Files (*.*). Save the (still empty) file as (e.g.)YourFileName.cu. - Right-click the Source Files node in the Solution Explorer window.
Select the Add/Existing Item... command. Select
YourFileName.cuand click on OK.
Complete the CUDA support by changing various project settings
Note that this step needs to follow after the Add CUDA source file step above, because the CUDA C/C++ node will not appear in the Project Properties dialog until after a .cu file has been added.
Under Visual Studio 2010:
- Show the project properties and select the CUDA C/C++ / Host node. For the release build, set the Run-time Library to Multi-Threaded (/MT). Do this for both the 32-bit and the 64-bit builds. Switch to the debug build and set the Run-time Library to Multi-Threaded Debug (/MTd). Again, do this for both the 32-bit and the 64-bit builds.
- Select Debug configuration and All Platforms,
and go to the Linker / Input node.
Add the following to the start of the Additional Dependencies list:
xlllibsd.lib;cudart.lib;curand.lib;
Select Release configuration and All Platforms, and remain on the Linker / Input node. Add the following to the start of the Additional Dependencies list:xlllibsr.lib;cudart.lib;curand.lib;
Under Visual Studio 2008 or 2005:
- Show the project properties and select the CUDA Runtime API / Host node. For the release build, set the Run-time Library to Multi-Threaded (/MT). Do this for both the 32-bit and the 64-bit builds. Switch to the debug build and set the Run-time Library to Multi-Threaded Debug (/MTd). Again, do this for both the 32-bit and the 64-bit builds.
- Select Debug configuration and All Platforms,
and go to the Linker / Input node.
Add the following to the start of the Additional Dependencies list:
xlllibsd.lib cudart.lib curand.lib;
Select Release configuration and All Platforms, and remain on the Linker / Input node. Add the following to the start of the Additional Dependencies list:xlllibsr.lib cudart.lib curand.lib;
- Select All configurations and All Platforms,
and go to the Linker / General node.
Add the following to the end of the Additional Library Directories list:
$(CUDA_PATH)lib\$(PlatformName)
- Select Release configuration and x64 platform,
and go to the CUDA Runtime API / Host node.
Set the Target Machine Platform to
x64. - Select Debug configuration and x64 platform,
and go to the CUDA Runtime API / Host node.
Set the Target Machine Platform to
x64.
Note that because of a bug in the GPU toolkit, under Visual Studio 2008 and 2005, you may need to (a) close the Project Properties dialog, (b) change the active configuration and/or platform and then (c) reopen the Project Properties dialog each time you make a change to the CUDA Runtime API node or any of its child nodes.
You should now be able to build the project under all configurations and platforms.