
Contents
- Why use XLLs?
- What is XLL Plus?
- What does XLL+ do?
- A Simple Example
- Useful Examples
- Other sources of information
Why use XLLs?
If you write mathematical software, then you will often be asked by your users to publish your work as an Excel add-in. You may also choose to use Excel as your primary testing tool when you are developing your code. Excel offers developers unrivalled flexibility and power as a testing environment for mathematical methods.
If you program primarily in C or C++, then you can plug your functions into Excel as add-in functions in run-time libraries known as XLL add-ins, using the MS Excel SDK.
There are alternative ways to plug C/C++ code into Excel, such as wrapping it in a COM module or registering the function in Visual Basic for Applications, but all of them fail to satisfy some key criteria: they either require some Visual Basic code or they do not work in versions of Excel prior to Excel 2002.
What is XLL Plus?
Programming with the Excel SDK is hard work:
- there's a steep learning curve;
- you must use opaque Excel data structures to pass data between Excel and your functions;
- example code is rare and unhelpful;
- and it's very easy to cause crashes or memory leaks.
XLL Plus is a toolkit that does all the hard work for you.
- Creates the project
- XLL+ creates a C++ project in MS Visual Studio, containing the XLL framework code and all the appropriate compiler, linker and debugging settings.
- Generates skeleton code
- The XLL+ function wizard generates code for each add-in function, to handle all the Excel issues such as registration, data structure transformations and memory management.
- Wraps the Excel SDK
- The XLL+ run-time libraries contain classes and methods that wrap all the important SDK functionality and make it simple and intuitive to use Excel features from your add-in functions.
What does XLL+ do?
First, you can use the XLL+ AppWizard to create a Visual Studio project that contains all the framework code for you, and instantly delivers a complete functioning XLL add-in, ready to be compiled and tested under MS Visual Studio 6 or Visual Studio .NET.
To create an Excel add-in function, use the XLL+ Function Wizard, which is available from within Visual Studio. Enter the names and types of the arguments to your function, which can be of any C/C++ type or can be vectors or matrices of any type. The Function Wizard will generate all the wrapper code for your add-in function. The wrapper code will take care of all the banal tasks of an add-in function, including:
- Registering the function with Excel at run-time.
- Reading data from Excel data structures into standard C++ data types such as std::vector<T>.
- Reading optional values, and applying default values for omitted optional arguments.
- Returning an error message to Excel if arguments are badly-formed or otherwise in error.
- Optionally, preventing the function from running from within the Excel Formula Wizard.
- Optionally, storing the results of the calculation in a cache, so that the answers will be available instantaneously if the function is called again with the same arguments.
Just add some code to pass the extracted inputs to your mathematical function, and a line of code to return the results to Excel, and your function is complete and ready to run.
You need no knowledge of Excel add-in functions, the Excel SDK or Excel data types. The Function Wizard generates all that code for you.
If you need to change the signature of the function later, you can use the Function Wizard to edit and amend all the generated code on your behalf.
A Simple Example
With XLL+, it's very quick and very easy to generate an Excel add-in wrapper for any mathematical function.
This example uses a ready-made matrix routine, gaussj, from Chapter 2 of "Numerical Recipes in C" (Cambridge University Press 1988):
/**
 * Linear equation solution by Gauss-Jordan elimination
 * @param   a   matrix of size [1..n][1..n]
 * @param   n   size of square matrix a
 * @param   b   matrix of size [1..n][1..m]
 * @param   m   number of solutions vectors
 */
void gaussj(double **a, int n, double **b, int m);
You don't need to do the steps in the walk-through yourself, since the text contains pictures and code showing what the XLL+ tool-kit is doing for you at each stage.
Creating the project
Use the XLL+ AppWizard to create an MS Visual Studio project with all the framework code needed for an XLL add-in.
-
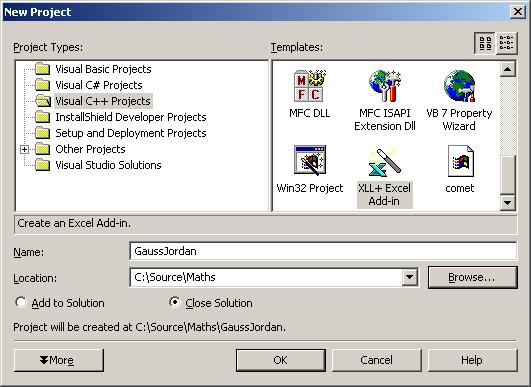
In Visual Studio, use the File - New - Project menu to show the New Project dialog, and select XLL+ Excel Add-in. Name the project GaussJordan
-
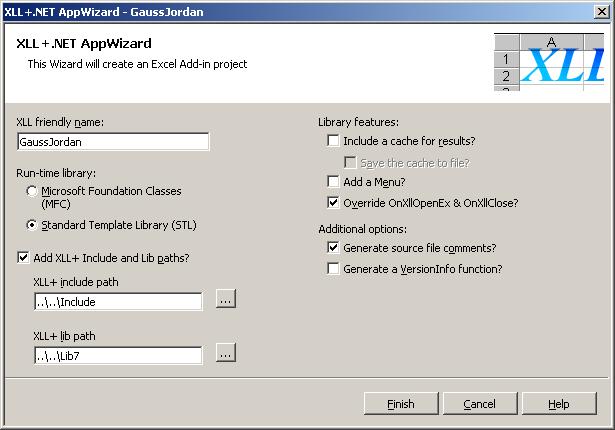
In the XLL+ AppWizard, accept all the default settings, and click on Finish.
Creating the add-in function
Use the XLL+ Function Wizard to create the wrapper code for your Excel add-in function.
-
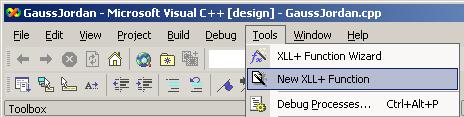
Click on the Tools - New XLL+ Function menu.
-
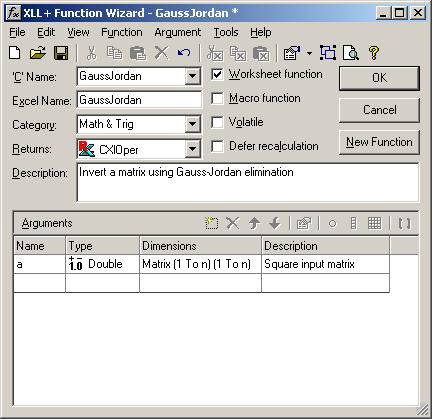
In the New Function dialog, enter the function's name, category and description.

-
In the XLL+ Function Wizard, enter the function's argument.
-
Click on OK to finish creating the add-in function. The Wizard will insert a block of code into the current source file, GaussJordan.cpp.
Code generated by the Wizard
Back in Visual Studio, inspect your new add-in function.
-
The code inserted by the Wizard looks like this:
// Function: GaussJordan // Purpose: Invert a matrix using Gauss-Jordan elimination //{{XLP_SRC(GaussJordan) // NOTE - the FunctionWizard will add and remove mapping code here. // DO NOT EDIT what you see in these blocks of generated code! IMPLEMENT_XLLFN2(GaussJordan, "RP", "GaussJordan", "a", "Math & Trig", "Invert a matrix using Gauss-Jordan" " elimination", "Square input matrix\000", "B0(1,n)0(1,n)a Sq" "uare input matrix\0appscope=1\0", 1) extern "C" __declspec( dllexport ) LPXLOPER GaussJordan(const COper* a) { XLL_FIX_STATE; CXlOper xloResult; BOOL bOk = TRUE; long n = -1; MTX_PTRS<double> mata; bOk = bOk && a->ReadMatrix(mata, "a", xloResult, &n, &n, XLA_ARRAY_FLAGS_NUMERIC_STD, 1, 1); if (!bOk) return xloResult.Ret(); //}}XLP_SRC // TODO - Set the value of xloResult return xloResult.Ret(); } -
The Wizard has generated the IMPLEMENT_XLLFN2 macro, which takes care of registering the add-in function with Excel.
-
The Wizard has generated a call to the ReadMatrix() method, which converts the array of cells a passed by Excel to a matrix of numbers mata.
-
ReadMatrix also inserts an empty row and column at the top and left of the matrix, to satisfy the expectations of the "Numerical Recipes" procedure, which takes a matrix of size [1..n][1..n], rather than the [0..n-1][0..n-1] of a standard C function.
-
The Wizard has left a TODO comment, to indicate where you should add some code.
Completing the code
You should add code to call the existing method gaussj() from your new add-in function. We only want the inverted matrix, not the solution vectors, so we will not be using the third and fourth arguments to gaussj, b and m. gaussj writes the inverted matrix over the input matrix, a, so we will be using our matrix mata for input as well as for output.
-
Add the code shown below.
extern "C" __declspec( dllexport ) LPXLOPER GaussJordan(const COper* a) { XLL_FIX_STATE; CXlOper xloResult; BOOL bOk = TRUE; long n = -1; MTX_PTRS<double> mata; bOk = bOk && a->ReadMatrix(mata, "a", xloResult, &n, &n, XLA_ARRAY_FLAGS_NUMERIC_STD, 1, 1); if (!bOk) return xloResult.Ret(); //}}XLP_SRC try { gaussj(&mata[0], n, 0, 0); xloResult.FromMatrix(mata, 1, 1); } catch (const char* err) { xloResult = err; } return xloResult.Ret(); } -
The first line calls gaussj() using the contents of the matrix and its upper bound as arguments:
gaussj(&mata[0], n, 0, 0);
-
The second line puts the results matrix mata into an Excel data type, ready to be returned to Excel. (The gaussj routine has left the empty row and column in the matrix, so we exclude them from the results passed to Excel by using the second and third arguments to FromMatrix, lLBound1 and lLBound2. The matrix will thus be converted from the [1..n][1..n] form returned by gaussj to the [0..n-1][0..n-1] form expected by Excel.)
xloResult.FromMatrix(mata, 1, 1);
-
Finally, the catch statement puts any error string thrown by gaussj() into the Excel data type instead of the result.
Testing and debugging the add-in
You can test your function in Excel from the Visual Studio debugger.
-
Build the project (Shift+Ctrl+B).
-
Hit the F5 key to start the debugger. The XLL+ AppWizard created all the necessary debug settings; so Excel will start and will open the debug build of your new add-in, GAUSSJORDAN.XLL.
-
Test the function by entering it into a range of cells:
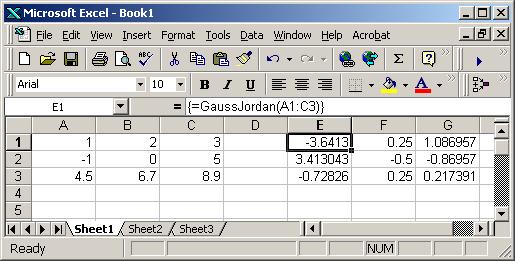
-
You may also want to use the Excel Formula Wizard to insert the formula:
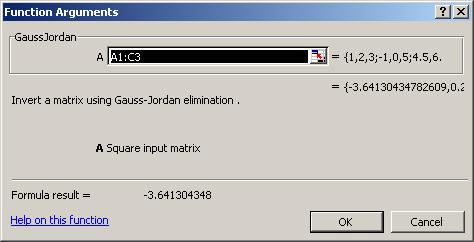
You will observe that the descriptions entered into the XLL+ Function Wizard appear here as help text.
Useful examples
The XLL+ tool-kit contains a wide variety of sample projects, demonstrating every aspect of the product. The following may be of particular interest.
- SimpOpt
- A typical calculator add-in, which values vanilla options
- AvgOpt
- An option value calculator add-in, which demonstrates the use of a results cache to speed up performance
- Integration
- Demonstrates how to create a meta-function from the relationship between two cells and use standard numerical methods to integrate the function
- CalcEvt
- Demonstrates how to trap the OnCalculate event, and add your own data to a worksheet
Other sources of information
There is a lot more useful information in the on-line help.
- Walkthroughs
- To learn how to use particular features, look at the Walkthroughs. They contain step-by-step instructions for all the most common development tasks when building an XLL.
- How Do I...
- Look at How Do I... for links to the essential XLL+ features.
- Sample Projects
- Inspect the sample projects, to find any features that you need for your own application.
- XLL+ User Guide
- The XLL+ User Guide is a complete introduction to XLL+. It contains comprehensive instructions for using all XLL+ features.